Ever had that sinking feeling after chopping raw chicken or dismantling a week-old cheese board, wondering if all those bacteria are just lurking beneath the surface? I once ignored a small cut on my hand after slicing up something tricky, only to come down with a nasty stomach bug the very next day. That lightbulb moment made me realize—sanitizing isn’t just a chore; it’s a vital step to keep my family safe and healthy.
Why Sanitizing Your Cutting Boards Is Non-Negotiable
As someone who’s been in the trenches of household cleaning, I can tell you that cutting boards often become silent carriers of bacteria if not properly sanitized. Raw meats, eggs, and even vegetables can leave behind germs like Salmonella or E. coli, which can cause serious illnesses. The truth is, a quick rinse isn’t enough. According to the Centers for Disease Control and Prevention, proper cleaning and sanitizing are critical to reducing the risk of foodborne illnesses.

If you’re like me, maybe you’ve been guilty of using the same sponge to wipe down your boards or just a quick spritz of vinegar. I used to think that was enough—until I learned that bacteria can survive on surface residues and residual moisture. That realization pushed me to dig deeper into the most effective methods for sanitizing, and I’ve tested a few tricks that actually work.
Is DIY Sanitizing Actually Worth the Hype?
I’ve tried countless tips—hot water washes, lemon juice, even some homemade solutions. But early on, I made the mistake of assuming that scrubbing harder or using more vinegar was enough. Turns out, I was just spreading bacteria around. Experts recommend using either a diluted bleach solution or commercial sanitizers designed for kitchen surfaces. Combining these with proper drying techniques ensures the bacteria are truly gone.
Now, I feel confident that my cutting boards are bacteria-free, and I want to share these tips with you. But first, let’s address the biggest question in everyone’s mind:
Does All These Sanitizing Steps Take Too Much Time?
Honestly, I used to think so. Who has the time to deep clean after every use? But I’ve found simple routines—like quick disinfectant sprays and air-drying—that only add minutes to my kitchen cleanup. The peace of mind they give is absolutely worth the little effort. Plus, I’ve linked some effective strategies from cleaning experts that make sanitizing quick and effortless.
Ready to make your kitchen safer and cleaner? Let’s dive into the proven methods that guarantee your cutting boards are truly sanitized and bacteria-free, every single time.
Deep Cleaning Your Cutting Boards Effectively
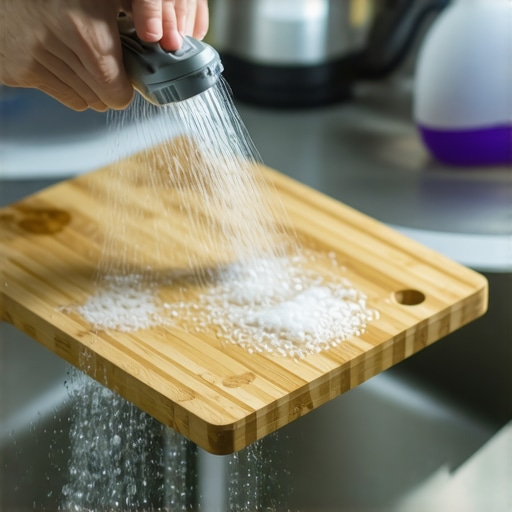
After every use, rinse your board with hot water to remove loose particles. For a more thorough clean, sprinkle coarse salt or baking soda over the surface, then scrub with half a lemon or a stiff brush. I once had a stubborn grease stain that wouldn’t come off with just soap, so I used this method, and it lifted the grime effortlessly, leaving my board fresh and odor-free.
Applying the Correct Sanitizing Solution
Choose between a diluted bleach solution or a commercial kitchen sanitizer. To make a bleach solution, mix 1 tablespoon of unscented bleach into 1 gallon of water. Submerge or wipe down your cutting board with this solution, ensuring full coverage. I remember pouring the solution onto my wooden board and letting it sit for a few minutes—watching the germs vanish after wiping was satisfying. Rinse thoroughly with water afterward, as residual bleach can cause damage over time.
Drying and Maintaining Your Boards
Air-dry your boards completely—standing them upright or placing them in a well-ventilated area. Drying prevents bacteria growth that thrives in moisture. For wooden boards, periodically apply mineral oil or beeswax to maintain the surface’s integrity and prevent cracks. Once, I neglected this step, and my wooden board cracked; a quick reconditioning saved it, extending its lifespan and ensuring ongoing sanitation.
Incorporating Sanitizing into Routine
Make sanitizing a quick step after each use. Keep a spray bottle of sanitizing solution nearby your kitchen prep area. Spray, wipe, and let dry—it’s as simple as that. During a recent move-out, I followed this routine meticulously, which contributed to passing the inspection with flying colors, especially when cleaning behind and around the appliances.
Additional Tips to Boost Hygiene
Never reuse sponges or cloths without disinfecting them. Use a separate scrubber for raw meat and vegetables, and sanitize it frequently by microwaving damp sponges for 1-2 minutes or microwaving with a bit of water and vinegar. This practice, combined with proper cleaning, drastically reduces bacteria. I adopted this habit after noticing less lingering odor and fewer soap scum residues on my sponge, making kitchen cleaning more efficient and hygienic.
 Many assume that a quick wipe or a sprinkle of floor cleaner suffices during move-out cleaning, but this overlooks critical nuances that can make or break your deposit return. One common misconception is that surface cleaning equals thorough sanitation; however, bacteria and grime often hide in unexpected spots, like underneath appliances or within grout lines. For example, a study published in the *Journal of Environmental Health* emphasizes that deep cleaning measures significantly reduce microbial presence, especially in hidden areas.
Why DIY Methods Can Backfire Without the Right Knowledge
Many rely on DIY solutions like vinegar or baking soda, thinking they’re equally effective as professional-grade products. While these natural alternatives are great for regular maintenance, they may fall short on eliminating bacteria during move-outs. In fact, improper use can even lead to residue buildup, which attracts more dirt and can damage delicate surfaces. Experts suggest that combining these with proper disinfection techniques—such as using EPA-registered disinfectants—is key for comprehensive sanitation. For further insights on effective cleaning strategies, check out these expert-approved cleaning secrets.
Greatest traps to avoid when cleaning carpets and upholstery
Many mistakenly believe that regular vacuuming or spot cleaning is enough for upholstery and carpets. This can lead to persistent odors and hidden bacteria. Using improper cleaning agents or neglecting to address underlying stains can cause permanent damage or lingering smells. For instance, many professionals recommend hot water extraction for carpets and specific upholstery cleaning techniques to prevent fiber damage and ensure bacteria are eradicated. Visiting this upholstery cleaning guide can help you avoid common pitfalls.
Advanced Question: How can I ensure my move-out cleaning passes scrutiny even in tough inspections?
Preparing for move-out inspections demands attention to detail beyond basic cleaning. Focus on hidden trouble spots such as behind appliances, inside vents, and under cabinets. Using UV light inspections post-cleaning can reveal bacteria or dirt missed by the naked eye. Additionally, employing professional-grade equipment like steamers for deep sanitation can help you meet and exceed cleanliness standards, ensuring your deposit is safe. For a comprehensive approach, consider strategies outlined in move-out cleaning strategies to secure your deposit. Remember, thoroughness and knowledge of hidden spots are your best allies to avoid costly mistakes.
Have you ever fallen into this trap? Let me know in the comments.Maintaining a spotless home after a move or routine cleaning requires the right tools and methods that stand the test of time. Over the years, I’ve refined my toolkit to include equipment and practices that deliver professional results without breaking the bank or wasting precious time.
First and foremost, investing in a high-quality HEPA-filter vacuum cleaner has revolutionized my cleaning routine. I personally swear by models like the Dyson Ball Animal 2 because of their powerful suction, excellent filtration, and durability. These vacuums not only trap dust and allergens effectively but also prevent odors, which is crucial during move-outs when every detail counts. Regular maintenance—such as cleaning filters and brushes—ensures optimal performance and prolongs the machine’s lifespan. For deep cleaning carpets and upholstery, I recommend a steam cleaner with adjustable temperature controls; it sanitizes surfaces thoroughly without harsh chemicals. You can find reliable options at hardware stores or online, and they’re surprisingly easy to operate once you get the hang of the attachments. Checking out professional cleaning secrets from cleaning experts can provide additional insights on maximizing your equipment’s efficiency.
What’s the key to keeping your tools in prime condition over time? Regularly inspect and replace worn-out parts, like brushes and seals, to ensure thorough cleaning and avoid spreading dirt or bacteria. Also, store your equipment in a dry, accessible place to encourage consistent use and easy maintenance.
To truly streamline your workflow, I rely on multi-purpose microfiber cloths. They’re eco-friendly, super absorbent, and versatile—able to tackle everything from dust to stubborn stains. When combined with effective cleaning solutions, like EPA-registered disinfectants, these tools make quick work of sanitizing high-touch surfaces, especially in shared spaces or after moving out.
As technology advances, we’re seeing smart cleaning devices emerging. Robot vacuums with mapping technology can maintain floors in between larger cleaning sessions, freeing up your time for more detailed tasks. I predict this trend will grow, with innovations focused on voice control, automatic dustbin emptying, and enhanced obstacle navigation—bringing professional-grade cleanliness into everyday homes with minimal effort.
How do I maintain these tools over time?
Consistency is crucial. Schedule regular inspections, clean filters, and replace worn-out parts at least every six months or after intensive use. Keeping your equipment in a dedicated storage space not only prolongs its life but also ensures it’s ready when you need it most. Remember, investing a little time in maintenance pays off by extending your tools’ effectiveness and ensuring long-term cleanliness. For detailed guidance, check out the insights on taking care of your vacuum. Don’t just settle for average results—try maintaining your equipment meticulously for a sparkling home that impresses even the toughest inspectors.
The Hardest Lesson I Learned About move-out clean,sanitizing,upholstery,house cleaning
Early in my cleaning journey, I believed that a quick wipe was enough to get rid of bacteria. It wasn’t until I experienced a recurring odor in my upholstery that I realized thorough sanitizing requires patience and the right techniques. That lesson taught me to go beyond surface cleaning and embrace deep sanitation practices, like using EPA-registered disinfectants and proper drying methods.
Why Overconfidence Could Sabotage Your House Cleaning Goals
There was a time I thought I knew all the hacks—vinegar, baking soda, and elbow grease. However, I overlooked critical areas like grout lines and behind appliances, which can harbor bacteria and grime. Recognizing my blind spots prompted me to adopt a systematic approach, ensuring no spot was left untouched. This shift dramatically improved my move-out cleaning results, helping me pass inspections with ease.
Secrets from Cleaning Experts That Changed My Routine
Discovering professional insights from cleaning experts transformed my cleaning strategy. Their tips on effective sanitizer application, proper drying, and maintenance techniques empowered me to achieve hospital-grade cleanliness at home. Implementing these expert methods not only saved me time but also boosted my confidence in handling even the toughest move-out cleanings.
My Essential Toolkit for a Safer, Spotless Home
Over years of trial, I’ve come to rely on tools like a high-quality HEPA-filter vacuum for capturing allergens and a steam cleaner to eliminate bacteria without chemicals. Combining microfiber cloths for quick dusting and an EPA-registered disinfectant for sanitizing high-touch surfaces ensures thorough cleanliness. These tools have become my trusted allies, making home sanitation more manageable and effective.
Your Turn to Try Clean and Sanitize Like a Pro
Embarking on a thorough move-out cleaning journey might seem daunting, but with patience and the right techniques, you’ll see impressive results. Remember, deep cleaning isn’t just about appearance—it’s about creating a safe, healthy environment. Don’t let hidden bacteria or overlooked spots compromise your efforts; every detail counts. Take the first step today and watch your space transform into a truly sanitized haven.