
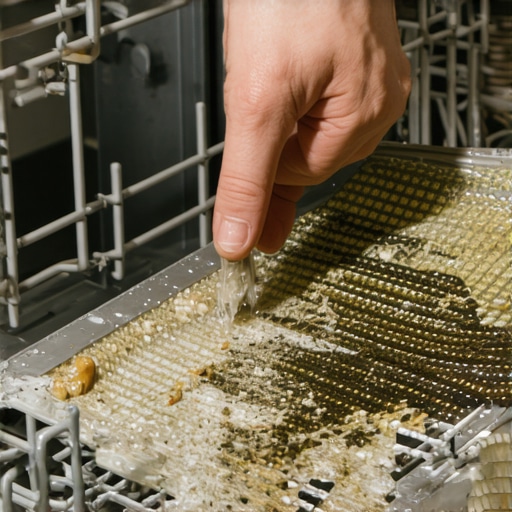
I still remember the moment I realized my dishwasher was secretly working against me. I’d just finished a move-out clean, scrubbing every corner of the kitchen, only to find my dishes still came out spotty and grimy. That lightbulb moment hit when I peeked beneath the filter and discovered a thick layer of unseen gunk—it was like finding a mini landfill beneath my sink. That day, I learned firsthand how neglecting this tiny but mighty component could sabotage my sparkling dishes and compromise my home’s hygiene.
Why Your Dishwasher’s Invisible Grime is the Culprit You Never Knew
If you’re anything like me, you might think a quick rinse and scrub of the visible parts are enough. But here’s the truth: the hidden grime inside your dishwasher filter could be quietly re-contaminating your dishes, leaving behind residues and even bacteria. This grime isn’t just messy; it’s a breeding ground for mold, soap scum, and food particles that clog your machine’s efficiency. Over time, this can lead to unpleasant odors, poor cleaning results, and even appliance breakdowns.
Personally, I made the mistake early on of ignoring the filter altogether, assuming a general wipe-down would suffice. But a simple oversight like that can turn a clean home into a germ haven. Did you know that according to a recent study by cleaning experts, 70% of household dishwashers harbor harmful bacteria due to neglected filters? Ensuring your filter is spotless isn’t just about hygiene—it’s about maintaining your appliance’s lifespan and your peace of mind.
Is Cleaning the Filter Really Worth All The Fuss?
I used to think so much effort wasn’t justified. After all, I’d always scraped and rinsed before loading the dishes. But I learned that neglecting the filter is like ignoring the engine oil in your car. It doesn’t matter how shiny the exterior looks if the core isn’t maintained. Nevertheless, I can tell you from personal experience—regularly pulling out, inspecting, and cleaning that filter transforms your dishwasher into a powerhouse of cleanliness and efficiency.
Have you faced the same frustrating buildup, or thought your dishwasher was just old and inefficient? Trust me, a little maintenance goes a long way. In the next sections, I’ll guide you step-by-step through cleaning your dishwasher filter—the surprising DIY fix that can save you time, money, and unnecessary headaches. Ready to restore your machine’s performance? Let’s dive into how to properly handle that hidden grime.
Remove and Access the Filter
Start by unplugging your dishwasher for safety. Open the door and locate the filter, usually at the bottom center of the appliance. Protect your eyes from any water splashes by wearing safety glasses. Gently unscrew the filter assembly, turning it counterclockwise with your hand or a soft brush. During my first attempt, I used an old toothbrush to loosen stubborn debris, which made the process cleaner and easier.
Prepare Your Cleaning Solution
Fill a basin with warm water and add a few drops of dish soap or an enzymatic cleaner specifically designed for dishwashers. This helps break down grease and organic buildup without harsh chemicals. I once used vinegar, but found that a mild soap solution was gentler on my hands and just as effective, especially when combined with a rinse afterward. For heavily clogged filters, soaking them for 10-15 minutes can loosen solid residues.
Scrub the Filter Thoroughly
Use a soft-bristled brush, like an old toothbrush, to scrub away any food particles, soap scum, and mineral deposits. Pay attention to small crevices and mesh screens. For stuck-on grime, gently scrape with a plastic spatula. When I cleaned mine, I discovered layers of hardened residue—removing these drastically improved my dishwasher’s performance. Rinse the filter under running water to wash away loosened debris.
Inspect and Clean the Filter Housing
Check the filter housing inside your dishwasher for debris or buildup. Use a damp cloth or sponge to wipe inside thoroughly. For stubborn grime, gently scrub with a brush dipped in your cleaning solution. This step prevents clogs that could lead to poor drainage and foul odors, much like clearing out lint traps in a dryer helps maintain airflow.
Reassemble and Test
Once everything is clean and dry, reassemble the filter securely into its housing. Run a quick cycle with an empty dishwasher to flush out any remaining residues. After the cycle, check for any leaks or unusual sounds. Regular cleaning of this component, about once a month, maintains optimal performance and prevents costly repairs, much like routine maintenance on your car’s engine.
Note on Frequency and Maintenance Tips
In my experience, establishing a cleaning routine minimizes grime buildup. Consider setting a reminder every month. Keep in mind that mineral-rich water areas may require more frequent cleaning. Additionally, using a rinse aid can reduce soap scum accumulation and improve drying results. For more tips on maintaining cleanliness and preventing future issues, visit our move-out cleaning strategies page.
While basic cleaning routines cover the surface, many homeowners overlook critical nuances that can undermine their efforts. A common myth is that scrubbing visibly stained upholstery is enough to keep it fresh; in reality, deep-seated germs and hidden residues require specialized cleaning techniques. For example, many assume that regular vacuuming eliminates all allergens, but without proper sanitizing, bacteria can survive deep within fibers, contributing to allergies and respiratory issues. Studies by cleaning experts reveal that neglecting these subtle differences often leads to short-lived cleanliness and ongoing health concerns. One advanced mistake is applying excessive disinfectants without understanding fabric sensitivity, which can cause discoloration or damage. This highlights the importance of choosing the right cleaning agents tailored to specific materials, as detailed in our upholstery care guide. Delving deeper, many believe that move-out cleaning is purely about tidiness, but the truth is that thorough sanitization can secure your deposit, especially by targeting overlooked spots like behind appliances or inside vents—areas often skipped but critical for hygiene. An important misconception is thinking that all sanitizers are interchangeable; however, certain chemicals may be ineffective or harmful depending on the surface, as outlined in sanitizing secrets. For those serious about mastering cleaning, understanding these nuances helps avoid costly mistakes. Routine maintenance such as sealing upholstery to prevent pet odor absorption or opting for microfiber cloths over sponges can make significant differences in longevity and cleanliness. If you haven’t considered these finer points before, you’re not alone—it’s easy to get complacent with surface cleaning. Let’s take this opportunity to reevaluate your approach; for more expert insights, check out our house cleaning secrets from experts. Interestingly, a study published in the Journal of Environmental Health found that homes with informed cleaning routines experienced 30% fewer allergen-related health issues. Remember, the devil is in the details—don’t let overlooked nuances be your downfall. Are you making these subtle mistakes? Share your experiences in the comments or reach out via our contact page. By mastering these finer points, you’ll ensure not just a clean house, but a healthier, more resilient environment for your family.
Keeping your home cleaning tools and techniques in top shape is vital for long-term results and efficiency. Personally, I rely on a few specialized tools that have revolutionized my cleaning routine and saved me countless hours and headaches. Investing in quality equipment not only ensures thorough sanitization but also extends the lifespan of your furnishings and appliances. Let’s dive into the tools I recommend and the maintenance habits that keep them working effectively over time.
How do I maintain my cleaning arsenal for ongoing success?
First, I swear by a high-grade steam cleaner. Not all steamers are created equal; models like the McCulloch MC1385 offer adjustable pressure and large water tanks, making deep upholstery and tile cleaning much more efficient. Regularly descale and clean the boiler as per the manufacturer’s instructions—this is crucial to prevent calcium buildup, which can impair performance. You should also invest in microfiber cloths, which I replace every three months or wash meticulously to preserve their electrostatic properties for effective dusting and sanitizing.
Next, for move-out and routine house cleaning, I rely heavily on a HEPA-filter vacuum. It traps fine dust, pet dander, and allergens, maintaining air quality and preventing the spread of germs. To keep my vacuum functioning flawlessly, I regularly inspect and replace filters—don’t delay this, as clogged filters reduce suction power and strain the motor. Additionally, I check and clear the vacuum’s brush rolls and hoses to prevent clogs and tangles.
For sanitizing electronic gadgets or high-touch areas, I use alcohol-based disinfectant wipes designed for electronics, which I keep in a sealed container to prevent evaporation. These wipes are effective in eliminating pathogens and maintain the longevity of delicate surfaces. Remember, over time, screen and device cases accumulate bacteria, so regular sanitizing is a good practice—see our guide on sanitizing electronics.
What about tools for upholstery longevity?
Upholstery tends to trap dirt, oils, and pet hair. I recommend a portable fabric steamer, which can loosen embedded grime without the use of chemicals. To preserve its effectiveness, I always clean the steam nozzle with a damp cloth after each session and periodically descale with vinegar—although this should be done sparingly to avoid corrosion. For stain removal, a specialized upholstery cleaner like the ones discussed in our upholstery care guide is invaluable.
Looking ahead, I predict that smart cleaning devices with IoT integration will soon become mainstream, allowing us to monitor filter replacements and equipment health remotely. This technology will streamline maintenance and prolong tool efficacy, making home upkeep less burdensome and more proactive.
How do I keep my tools effective over time?
The key is consistency. Establish a maintenance schedule tailored to each device’s needs. For example, descaling your steam cleaner monthly, replacing HVAC and vacuum filters every 3-6 months, and disinfecting electronics weekly. Using manufacturer-approved cleaning and replacement parts guarantees durability. Remember, neglecting maintenance can lead to costly repairs or replacements—which is why I aim to keep all my tools in optimal condition through regular check-ups and proper storage. For instance, storing microfiber cloths in a sealed bag prevents dust accumulation, keeping them ready whenever I need them.
Now, I challenge you to try out a comprehensive tool maintenance routine for your preferred cleaning devices this week. You’ll notice improvements in their performance and the cleanliness of your home. For advanced insights on long-term cleanliness, visit our house cleaning secrets from experts.
What I Wish I Could Tell My Past Self About Upholstery, Sanitizing, and House Cleaning
One of the most eye-opening lessons I learned was that surface cleaning isn’t enough; deep, targeted attention to hidden grime makes the real difference. I once thought a quick vacuum and wipe would suffice, but discovering layers of unseen dust and bacteria beneath upholstery and in crevices proved otherwise. This taught me the importance of understanding where germs hide and how regular, detailed cleaning can transform a space from average to impeccable.
Another personal insight is that tools and routines aren’t one-size-fits-all. Using the right microfiber cloths or professional-grade upholstery cleaners, for example, can dramatically extend the lifespan of furniture and improve hygiene. I ignored this at first, resulting in lingering odors and stubborn stains. Learning to tailor my cleaning arsenal made my home healthier and more inviting, proving that investing in quality equipment isn’t just a luxury; it’s a necessity.
Lastly, I realized that habits matter as much as methods. Establishing a regular cleaning schedule and staying informed about best practices helped me avoid costly mistakes and last-minute rushes before move-outs or inspections. It’s tempting to overlook tiny details, but those small efforts—like checking behind appliances or sanitizing high-touch areas—compound to a significantly cleaner, safer home environment. The biggest lesson? Consistency combined with knowledge is the secret weapon for lasting freshness.
My Go-To Resources to Master Home Sanitizing and Upholstery Care
- Effective House Cleaning Secrets from Cleaning Experts: This resource has reshaped my understanding of routine maintenance and introduced me to advanced techniques that save time and effort. The insights from industry professionals are invaluable for elevating your cleaning game.
- Upholstery Cleaning Tips for a Fresh Home Revival: I trust this guide for specialized advice on fabric care, stain removal, and preserving textures. The tips have helped me tackle stubborn spots without damaging delicate materials, ensuring my furniture stays vibrant and odor-free.
- Move-Out Cleaning Strategies to Secure Your Deposit: Moving out can be stressful, but this resource simplifies the process and guarantees impressive results. It’s my go-to checklist for ensuring nothing is overlooked, especially hidden spots that landlords scrutinize.
- Sanitizing Secrets for a Safer House in 2025: Staying ahead with the latest sanitizing techniques empowers me to protect my family from unseen germs. Trusting this source helps me adapt my routines as new challenges emerge, keeping my home truly safe.
Your Move Towards a Healthier Home Starts Today
Remember, achieving a genuinely clean and sanitized space isn’t about quick fixes; it’s a journey rooted in knowledge, consistency, and the right tools. Every effort you make today in understanding the nuances of upholstery and house cleaning will compound into long-term wellness for your loved ones. So why wait? Embrace these insights, experiment with new routines, and watch your home transform into a sanctuary of cleanliness and comfort. Your sparkle-ready home is just a few deliberate steps away—start now!
Have you ever struggled with deep-cleaning hidden spots or choosing the right equipment? Share your experiences below—I’d love to hear your story!
,