There was this one Saturday afternoon when I glanced down to find a suspicious, slick patch on my hardwood floor after a DIY project gone awry. My heart sank. I had just spent hours buffing and polishing, only to realize I’d accidentally tracked sticky glue from a craft session across my pristine surface. That moment was a lightbulb moment for me — I realized how tricky it is to remove sticky residue without damaging those beautiful wood grains.
Say Goodbye to Sticky Residue Woes on Your Hardwood Floors
If you’ve ever found yourself in a similar predicament, you know the frustration of trying countless cleaning tips that either don’t work or worse, ruin the finish. Well, I’ve been there, and over time, I discovered safe, proven methods to get rid of stubborn sticky spots without risking harm to my floors. Today, I promise to share these expert-tested secrets so you can reclaim your flooring’s beauty with confidence.
Will Harsh Chemicals Harm Your Floors More Than Help?
Early on, I made a mistake by grabbing the strongest chemical cleaners I could find, thinking they would dissolve the sticky mess quickly. Turns out, that harsh approach caused more harm — scratched and dulled my hardwood finish. Experts warn that aggressive chemicals can penetrate and weaken the protective layer of your floors, leading to long-term damage (source). So, patience and gentle methods are truly your best friends here.
Ready to learn how to safely tackle those stubborn spots? Let’s dive into simple, effective techniques that protect your investment and leave your floors looking flawless.
.
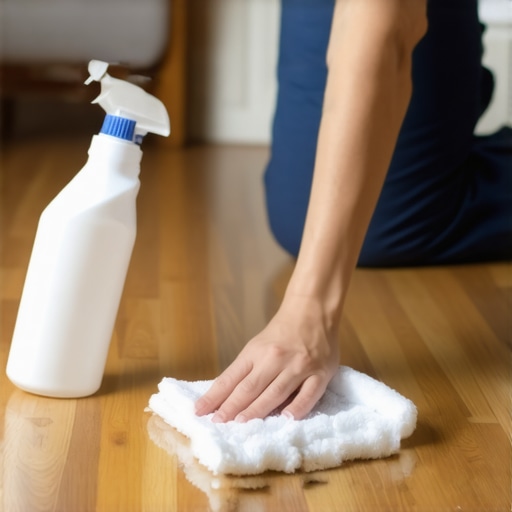
Start with Gentle Solutions to Loosen the Adhesive
My first attempt involved applying warm, soapy water using a soft cloth to soak the sticky area. I held the cloth over the residue for several minutes, allowing the moisture to penetrate the glue. This softened the adhesive, making it easier to lift without scraping or scratching the wood. Think of it like softening dried paint before peeling—patience is key. Continue this process until the residue begins to lift effortlessly.
Use a Plastic Scraper for Precise Removal
Once the glue softened, I gently used a plastic putty knife to lift the residue. Avoid metal tools, which can gouge the wood finish. Hold the scraper at a shallow angle and work slowly, scraping away the residue in small sections. A steady hand prevents damage, much like peeling a stubborn sticker without tearing the paper. If small bits remain, reapply a damp cloth and repeat the process.
Apply a Mild Solvent for Stubborn Spots
If the sticky patch persists, I chose a mild solvent like mineral spirits or white vinegar diluted with water. I dipped a soft cloth into the solution, then applied it directly to the residue, letting it sit for a few minutes. This breaks down the adhesive’s bonds. Remember, always test a small inconspicuous area first to ensure it doesn’t affect the finish. After soaking, gently wipe the area with a clean cloth, removing any softened glue.
Finish with a Clean and Dry Cloth
After removing the residue, immediately wipe the area with a damp cloth to eliminate any leftover solvent. Follow up with a dry microfiber cloth to restore the wood’s luster. This step prevents streaks and ensures no residue remains that could attract dirt or damage the finish. Patience ensures your floors stay pristine and undamaged.
Protect Your Floors During Future Projects
To avoid repeating this ordeal, consider laying down protective coverings like drop cloths or painter’s plastic during crafts or renovation work. Use painter’s tape to secure the edges and create a barrier. This simple action is like wearing gloves when handling chemicals—both protect your surfaces and save you time in cleaning afterward.
Remember, quick fixes with harsh chemicals can do more harm than good (source), so always opt for gentle, proven methods. Handling sticky residues carefully preserves both durability and beauty of your hardwood flooring, ensuring your home remains inviting and spotless.
< >
>
While most homeowners believe they have the cleaning process down, there are subtle pitfalls and misconceptions that can compromise the results. One common myth is that using disinfectants alone guarantees a germ-free surface. In reality, many disinfectants are ineffective on porous materials like upholstery or certain types of countertop surfaces. An expert study emphasizes that chemical efficacy varies significantly based on contact time and surface porosity (source), implying that superficial spraying isn’t enough—proper technique and understanding material compatibility are crucial.
What Many Fail to Consider About Move-Out Cleanings?
Many tenants and even professional cleaners focus solely on visible dirt or stains, neglecting hidden grime in less obvious spots. Overlooking areas like behind appliances, under cabinets, or within ventilation grates can lead to lost deposits. Landlords often inspect these overlooked spaces, and stubborn residues there frequently cause deposit deductions. For instance, failing to thoroughly clean HVAC filters or neglecting to remove grout haze can be costly errors. To avoid such pitfalls, review specific inspection checklists like this detailed guide and approach cleaning strategically, not just superficially.
Why Deep Cleaning Upholstery is Tricky and What You Should Know
Many believe that regular vacuuming suffices for upholstery care, but this is where misconceptions emerge. Deep cleaning fabrics, especially delicate or synthetic blends, requires tailored approaches. Using excessive moisture or harsh chemicals can damage fibers or lead to molding. For example, cleaning a vegan leather sofa with alcohol-based products can cause cracking, undermining longevity. Instead, utilizing specific techniques like low-moisture cleaning or professional steam methods ensures longevity and freshness (see more tips). Knowing fiber types and stain characteristics helps prevent costly mistakes and ensures thorough sanitation.
Are you falling for any of these common misconceptions? Remember, surface appearances can be deceiving, and understanding the nuances makes all the difference. For comprehensive strategies on effective house cleaning, explore expert insights here. Also, a strategic approach to sanitizing your home ensures safety without risking damage—something worth mastering in today’s health-conscious world. Have you ever fallen into this trap? Let me know in the comments.

Investing in the Right Equipment for Long-Term Results
Achieving and maintaining a spotless home goes beyond basic cleaning routines. It requires high-quality tools that are built to last and deliver consistent results. For instance, I personally swear by using a Dyson V11 Torque Drive vacuum. Its powerful suction and advanced filtration system make quick work of dust, pet hair, and allergens, especially in high-traffic areas. Its cordless design offers maneuverability that simplifies access to tricky spots, like under furniture or behind plants.
When it comes to upholstery, a Bissell SpotClean Pro has transformed my approach to stain removal. It’s a dedicated handheld cleaner that penetrates deep into fabric fibers, removing even stubborn spots without saturating the material. This tool is particularly effective for delicate fabrics where over-wetting can cause damage. It’s a step up from traditional sprays and can save you from costly professional services.
Why I Trust My HEPA Air Purifier
Maintaining air quality is crucial for a healthy, sanitized environment. I recommend a HEPA-filtering air purifier with a solid CADR rating. Not only does it trap airborne particles and allergens, but it also reduces odors from cooking or pets. Regularly changing the filters, which I do monthly, ensures that the unit maintains optimal performance over time and continues to protect your home environment.
Streamlining Move-Out Cleanings with Specialized Tools
Preparing for a move-out cleaning can seem daunting, but having the right gear makes a significant difference. A telescoping grout brush equipped with stiff bristles helps reach into those narrow edges and corners that standard mops and cloths miss. I’ve found that scrubbing baseboards, behind appliances, and within ventilation grates with this tool cuts cleaning time in half and guarantees no detail is overlooked.
For thorough sanitation, an commercial-grade ultraviolet (UV) light wand is invaluable. It helps disinfect surfaces like countertops, light switches, and doorknobs—areas that are often touched and harbor germs. UV sanitizing lamps are an investment but provide peace of mind, especially during move-outs or after hosting guests.
Looking Ahead: The Future of Home Maintenance Tech
As technology advances, I predict a shift toward smart, integrated cleaning systems that automatically monitor cleanliness levels and alert homeowners to upcoming maintenance needs (source). Devices like robotic cleaners equipped with sensors capable of detecting dirt buildup in real-time will become more affordable and accessible, streamlining the process further.
Start experimenting with one of these tools—maybe the handheld upholstery cleaner or the UV sterilizer—to elevate your home maintenance routine today. Precise, efficient equipment not only saves time but also ensures your cleaning efforts stand the test of time, keeping your home safe and inviting year-round.
< >
>
Lessons That Changed My Approach to Sanitizing and Cleaning
- I realized that overestimating traditional cleaning methods can cause more harm than good, especially with delicate surfaces—gentle, informed techniques truly preserve integrity.
- Ignoring small, hidden spots during move-out cleanings often results in deposit deductions; thorough inspections have taught me to pay attention to the unseen corners.
- Mixing harsh chemicals without understanding their interaction can damage fabrics and surfaces—I now prioritize knowledge and safety over quick fixes.
Tools and Resources That Elevate My Home Care Game
- The Dyson V11 Torque Drive vacuum has become my go-to for quick, deep cleaning due to its powerful suction and versatility, making everyday maintenance effortless.
- A Bissell SpotClean Pro allows me to treat upholstery stains safely and effectively, saving money and extending the life of my furniture.
- Consulting expert guides like this resource has improved my understanding of proper cleaning techniques, especially on porous or sensitive surfaces.
- Investing in a high-quality HEPA air purifier has dramatically improved my home’s air quality, reducing allergens and odors—an essential for a healthy living space.
Your Next Move Towards a Spotless, Sanitized Home
Remember, home sanitizing and cleaning is a continuous journey—not a one-time effort. The more you learn and equip yourself, the better your space will serve as a sanctuary. Never shy away from trying new tools or seeking expert advice—your home’s health depends on it.
Are you ready to implement some of these insider tips and tools to transform your cleaning routine? Let me know your biggest challenge in the comments below!
.