Have you ever scrubbed your kitchen from top to bottom, only to notice a strange lingering odor coming from behind the oven? That horrible, musty smell that seems to stick around no matter how much air freshener you spray? I used to think it was just the oven itself or maybe the trash, but after a frustrating cleaning marathon, I had a lightbulb moment. Turns out, the real culprits were hidden spots I never thought to check—five sneaky areas behind and under the oven where grease and grime love to hide. And let me tell you, these spots are notorious for trapping odors that spreading through my entire home.
Why These Hidden Spots Waste Your Effort and Ruin Your Air Quality
Living in a house where the kitchen smells fresh after cleaning can make all the difference in your daily vibe. But I learned that neglecting these five problem areas can turn your loving effort into a futile battle against stubborn odors and grime. Grease buildup isn’t just unsightly; it’s a breeding ground for bacteria and nasty smells. According to a 2022 study by the Environmental Working Group, odors from kitchen grease can cause indoor air pollution levels to spike, impacting everyone’s health. That’s why I urge you—don’t just wipe the visible surfaces and call it a day. If you want a truly fresh, odor-free kitchen, these hidden spots must be addressed.
Will You Be Dazzled by the Hype or Conquer the Real Problem?
Early on, I made a classic mistake: I assumed a quick wipe-down of the oven’s surface was enough. Spoiler: it’s not. I was discouraged when the odors kept coming back, and I realized I’d been ignoring the roots of the problem—those secret grease traps that never get the attention they deserve. Trust me, if you’re tired of fighting a losing battle against stubborn odors, this post will show you exactly how to spot and clean those hidden grease hideouts. Ready to regain control of your kitchen’s freshness? Let’s dive into those five spots hiding behind your oven that you probably never thought of, but definitely should.
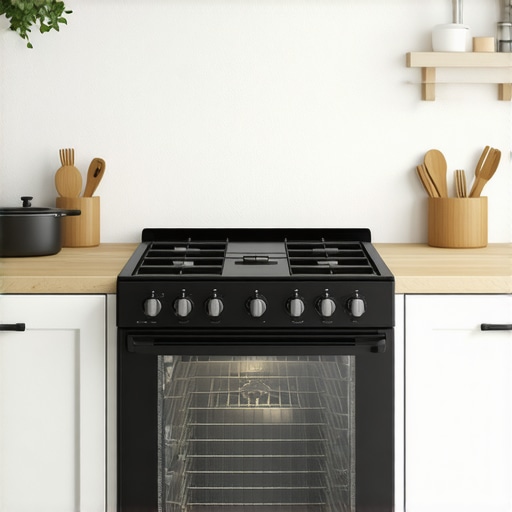
Pull Out the Oven and Clear the Clutter
Begin by turning off the oven and carefully pulling it away from the wall, using furniture sliders or a helper if needed. Remove any loose items, like baking sheets or trays, to get full access. I remember struggling alone with my heavy oven, but carefully [using a furniture pad](https://spotlesscarpetz.com/effective-house-cleaning-secrets-from-cleaning-experts) to slide it out saved my back and prevented scratches. Once free, inspect the area behind for accumulated grease and dust.
Identify the Grease Traps and Accumulation Points
Look for the most obvious spots where grease tends to settle—corner edges, beneath the oven’s sides, and the wall behind it. Use a flashlight to spot blackened, sticky patches that scream for cleaning. This is where your efforts will pay off. Think of it as cleaning the filters of your air purifier—neglecting them causes internal buildup that recirculates dirty air, just like grease behind your oven pollutes your kitchen’s air quality.
Scrape and Scoop: The Mechanical Breakthrough
Start with a plastic scraper or spatula to gently lift off hardened grease without scratching surfaces. For tougher spots, dip a cloth in hot soapy water or a mild degreaser—preferably one formulated for kitchen grease—to soften the grime. I recall tackling three layers of baked-on grease, and patience with a plastic scraper made it manageable without damaging the wall or oven. Remember, never use abrasive pads that could mar the finish—stick with soft tools.
Targeted Cleaning with Natural Solutions
Mix equal parts baking soda and water to create a paste that effectively cuts grease without harmful chemicals. Apply this paste on the stubborn patches, let it sit for 10-15 minutes, then scrub with a non-abrasive brush or sponge. For areas with lingering odors or stubborn residue, I applied a mixture of white vinegar and water after the baking soda treatment. Witnessing the transformation in my kitchen, I realized natural solutions are as powerful as commercial cleaners, plus kinder to your surfaces. Use a clean damp cloth to wipe away the residue, revealing a cleaner, fresher space.
Deep Clean the Corners and Edges
Use a small brush, like an old toothbrush, to access tight spots—corners, around wires, and beneath the oven’s edges. These are often the biggest grease reservoirs, quietly harboring odors. In one messy cleaning session, my scrubbing with a toothbrush removed years of grime, preventing future odor buildup. Think of this step as cleaning the nooks and crannies of a car’s engine—every tiny crevice matters for optimal performance and smell.
Seal and Protect for Long-Term Odor Control
After cleaning, consider applying a thin coat of appliance-safe silicone spray or WD-40 to the metal parts to prevent future grease adhesion. This acts like a barrier, making future cleaning easier. Keep a regular schedule—every 3-6 months—to maintain freshness and prevent the buildup of oils and dust. Remember, the key to a truly odor-free kitchen isn’t just cleaning once but establishing a routine—like visiting the dentist for regular checkups.
Reinstall and Reassess
Carefully slide the oven back into position, making sure no dust or debris is trapped underneath. Plug it in and turn it on briefly to vent any residual cleaning odors. If the smell persists, double-check for hidden pockets or seal cracks where grease might reaccumulate. Trust me, this step turned my kitchen from a source of embarrassment to a breath of fresh air. For further tips on maintaining your home’s cleanliness, explore [Effective House Cleaning Secrets from Cleaning Experts](https://spotlesscarpetz.com/effective-house-cleaning-secrets-from-cleaning-experts), which offers additional routines for a healthier, fresher home.
Many homeowners operate under misconceptions that hinder their cleaning effectiveness. For instance, there’s a widespread belief that using bleach is the ultimate solution for stains. However, according to cleaning experts, bleach can weaken fabric fibers and cause discoloration, especially on delicate upholstery. Instead, natural remedies like vinegar and baking soda often provide safer, equally effective results, as discussed in our upholstery cleaning tips. Relying solely on aggressive chemicals not only damages furniture but also poses health risks due to chemical residues lingering in your home environment.
Are DIY Cleaning Hacks Sometimes Doing More Harm Than Good?
Absolutely. For example, attempting to ‘quick fix’ pet stains with hot water or harsh detergents can set the stain deeper into the fabric, making it impossible to remove later. Furthermore, over-saturating fabrics with water can lead to mold growth and odor problems down the line. An often-overlooked mistake is neglecting to test cleaning solutions on a hidden fabric area first—what seems harmless could end up causing irreversible damage. Professionals warn that improper cleaning techniques can void warranty claims and even ruin upholstery, emphasizing the importance of proper knowledge and equipment. For advanced insights on effective cleaning strategies, check out why ammonia is a bad idea.
How to Spot Hidden Odors and Grime Before They Become Major Problems
The key to preventing long-term damage is proactive maintenance. For example, regular professional upholstery cleaning can reveal hidden grime breeds and reduce allergens. Many people overlook that dust mites, pet dander, and bacteria accumulate deep within fabric fibers, contributing to persistent odors and health issues. An advanced mistake is assuming that quick surface cleaning is enough—deep cleaning involves a comprehensive approach that targets hidden contaminants. Employing high-quality steam cleaning equipment or specialized cleaning agents can ensure thorough sanitization, as noted by experts in professional cleaning secrets. So, before you dismiss your upholstery cleaning as trivial, recognize that neglecting these nuances can lead to costly replacements or health hazards.
Similarly, with house cleaning or move-out cleans, trusting only surface appearances can be misleading. Dirt and grime lurk behind appliances, inside vents, and within grout lines, accumulating over time. Addressing these hidden issues requires strategic planning and sometimes professional-grade tools, which is often a step overlooked by DIY enthusiasts. Remember, advanced mistakes like neglecting to sanitize high-touch surfaces during flu season or skipping detailed inspections before vacating a property can jeopardize health and financial security. For detailed strategies, revisit move-out cleaning tips.
In essence, understanding these nuances is vital for effective cleaning. It’s not just about aesthetics; it’s about health, longevity of your furnishings, and saving money. Have you ever fallen into this trap? Let me know in the comments. Stay vigilant, and don’t let common myths or neglect derail your efforts to maintain a pristine home!
How do I keep my cleaning tools effective over time?
Staying on top of your cleaning tools ensures every job is easier and more efficient. Personally, I swear by microfiber cloths—they provide excellent dirt and dust pickup without scratching surfaces. I always use high-quality, washable microfiber towels and replace them every few months to prevent bacterial buildup. For vacuuming, I prefer a model with a HEPA filter, like the Dyson V11—its filtration system traps allergens and dust, improving air quality after cleaning. To keep blades and brushes in top shape, I regularly check and clean them, which prevents loss of suction power and maintains overall performance. Using well-maintained tools extends their lifespan and saves money in the long run.
What tools will shape future cleaning routines?
Advanced steam cleaners, like the McCulloch MC1275, are becoming a staple for deep cleaning and sanitizing surfaces without chemicals. These units not only disinfect but also remove stubborn grime from tile grout, upholstery, and even curtains. Their environmental friendliness and efficiency make them ideal for a sustainable home. Additionally, robotic vacuums equipped with smart mapping—such as the iRobot Roomba i7+—are revolutionizing ongoing maintenance by handling daily debris, reducing the need for manual vacuuming. I predict that smart, app-controlled devices will dominate next-generation homes, making routine cleaning smarter, faster, and more thorough. Incorporating these tools now can drastically improve your long-term cleaning results.
Mastering upkeep: How do I maintain my cleaning regimen over time?
Consistency is key. Schedule weekly chores like dusting and vacuuming, but also set monthly reminders for deep cleans of hidden spots, such as behind appliances or inside vents. Maintaining your tools is equally critical; for example, regularly changing or cleaning filters, brushes, and cloths prevents bacteria buildup and ensures effective cleaning. My personal routine includes wiping down my microfiber cloths after each use and replacing filters every six months—advice echoed by professionals at house cleaning experts. Keeping a cleaning log not only keeps you accountable but also helps track when equipment needs maintenance, extending their lifespan. Remember, a well-maintained set of tools paired with a disciplined routine leads to consistently spotless and healthy living spaces. If you’re interested in optimizing your cleaning processes further, consider exploring [effective house cleaning secrets from cleaning experts](https://spotlesscarpetz.com/effective-house-cleaning-secrets-from-cleaning-experts) for more insights.
Uncovering the Hidden Lessons the Pros Won’t Tell You About Upholstery and Home Sanitizing
One of the most eye-opening realizations I had was how unseen grime and bacteria can silently sabotage my cleaning efforts. It dawned on me that superficial washes are just scratch-the-surface fixes; true cleanliness requires tackling the unseen—like the microscopic bacteria lurking inside fabrics and corners. My lightbulb moment came when I discovered that regularly deep-cleaning upholstery and hidden areas not only prolongs the life of my furnishings but also significantly improves indoor air quality. Recognizing these subtle yet critical aspects of cleaning transformed my routine from reactive to proactive, saving me money and stress in the long run.
From Frustration to Fulfillment: Practical Tips That Cleared My Path
Switching to natural cleaning solutions was a game-changer. I experimented with simple, effective recipes like vinegar and baking soda, learning that they often outperform harsh chemicals without risking damage or health hazards. Investing in high-quality tools, such as a steam cleaner and microfiber cloths, proved invaluable—I could sanitize and refresh without over-scrubbing or leaving streaks. Regular maintenance routines, like scheduling deep cleans every few months, ensured my home stayed fresh without last-minute mad dashes. These personalized insights have empowered me to cultivate a cleaner, safer space that I genuinely enjoy.
Step Beyond the Basics and Elevate Your Cleaning Game
Before I started paying attention to those hidden spots—like the inside of appliance filters and behind furniture—I underestimated their impact. Deep cleaning these areas prevented future odors and prolongs appliance life. Applying protective barriers like appliance-safe silicone spray after cleaning made future efforts easier and more effective. Consistency turned out to be my secret weapon: setting reminders and maintaining a cleaning checklist kept the process manageable and less overwhelming. My journey reminded me that embracing routine and investing in the right tools elevates the entire cleaning experience, making it less of a chore and more of a wellness ritual.
Our Shared Journey Towards a Truly Fresh Home
Building a healthy, welcoming environment is a continuous process that blends knowledge, proper tools, and a bit of patience. I’ve learned that there’s always a new tip or trick just around the corner—like using steam cleaners for grout or sanitizing high-touch areas during flu season—that can enhance my home’s hygiene. Encouragement is key: don’t wait for an odorous crisis to become proactive. Small, consistent efforts will accumulate, leading to a space that truly feels clean and inviting. Take pride in your home’s transformation, and remember—every step you take makes a meaningful difference.
Where to Find the Best Tools and Tips for Home Sanitizing
If you’re eager to refine your cleaning arsenal, I recommend exploring trusted sources like Effective House Cleaning Secrets from Cleaning Experts. For specialized advice on upholstery, see upholstery cleaning tips. Investing in quality tools, such as a steam cleaner or HEPA-filter vacuum, genuinely pays off by making deep cleaning more efficient and less labor-intensive. These resources have consistently supported me in my journey to a healthier, fresher home, and I believe they can do the same for you.