It was a Sunday afternoon when I finally looked at my beloved chenille sofa and realized, with a sinking feeling, that I hadn’t cleaned it properly in ages. It was then I understood—if I didn’t learn how to sanitize my 2026 chenille sofa correctly, I risked damaging its delicate pile and ruining the cozy feel I loved so much. That moment of clarity was a lightbulb, sparking my journey to find effective and safe cleaning methods.
Why Sanitizing Your 2026 Chenille Sofa Matters More Than Ever
In today’s homes, our furniture isn’t just about style—it’s about health, hygiene, and longevity. Chenille, with its soft, plush texture, is a favorite for many, but it can also trap germs, dust mites, and allergens if not properly maintained. Improper cleaning can turn your comfy retreat into a breeding ground for bacteria. According to the CDC, regular cleaning and sanitizing are crucial for reducing germs indoors, especially on fabrics that host dust mites and pet dander. Yet, many of us make mistakes early on, like using harsh chemicals or excessive water, which can ruin the fabric’s delicate pile. I certainly did, and I paid the price—sacrificing the plushness for a quick fix, leading to fraying and loss of softness. So, how do you sanitize your chenille sofa safely without ending up with a damaged mess? That’s exactly what I want to help you with today. If you’ve faced this dilemma—juggling cleanliness with fabric care—stay tuned. We’ll cover practical tips that protect your sofa’s integrity while making it sparkle. Let’s dive into the secrets of smart sanitizing that keeps your furniture inviting and hygienic at the same time.
Prepare Your Workspace for Precise Cleaning
Begin by removing all loose items from the sofa, like cushions or blankets, and clear its vicinity of distractions. This creates a clutter-free zone for effective cleaning. Think of it as clearing your workspace before painting — the clearer the area, the better the results. I once started a quick clean without clearing the clutter, which resulted in knocking over a glass and making a mess that delayed the process. Always have your cleaning tools and patching supplies nearby to save time.
Vacuum Thoroughly to Remove Dust and Debris
Use a handheld vacuum or brush attachment to meticulously vacuum every surface, paying close attention to seams and tufts where dust and allergens hide. This step ensures you don’t trap dirt beneath your sanitizing agents. I remember an instance where skipping this step led to lingering pet hair after cleaning, proving that suction is key. Think of vacuuming as the foundation; without it, your sanitize efforts are less effective.
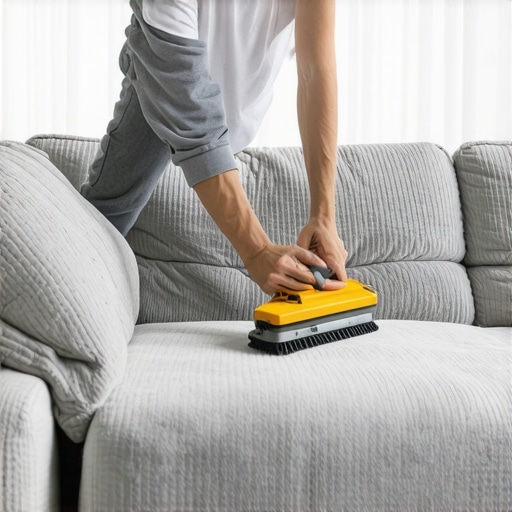
Select the Right Sanitizing Method for Your Fabric
For 2026 chenille, dry cleaning approaches work best. Use a professional-grade upholstery dry-cleaning foam, which penetrates fibers without introducing excess moisture. Apply it with a soft brush, spreading evenly and working into the pile. I once attempted to use a water-based cleaner, resulting in stiff fabric and frayed edges. Remember, excessive water can damage delicate fibers; consult this guide for pet-safe tips and avoid over-saturation.
Apply Sanitizer with Precision and Care
Choose a fabric-safe sanitizer that’s specifically formulated for use on upholstery, preferably one with antimicrobial properties. Lightly spritz the sanitizer using a spray bottle, ensuring an even coat. Avoid oversaturating; think of it like applying perfume—less is more. I once soaked the entire sofa, which caused the fabric to stiffen temporarily, highlighting the importance of controlled application. Use a clean, soft cloth to gently buff the surface after application for even distribution.
Focus on Stains and Deep Piles
For stubborn stains or deep-seated dust mites, target these areas with specialized solutions. For example, a mix of baking soda and essential oils can deodorize and disinfect without harsh chemicals. For stubborn pet related stains, test a small hidden area first by following these stain removal strategies. Be cautious with mechanical brushing—overdoing it can fray the fabric’s fibers. Think of this step as giving your sofa a spa treatment, focusing on the areas that need extra care.
Allow Proper Drying and Ventilation
Leave the sofa to air dry in a well-ventilated room, ideally with natural sunlight to aid sanitation. Turn on fans or open windows to accelerate the process. Avoid using heat sources directly on the fabric. I learned this the hard way after attempting to dry it with a hairdryer—risking damage and discoloration. Patience here ensures the sanitizing process sets properly and prevents mold growth.
Final Inspection and Maintenance
Once dry, inspect your work meticulously, checking for missed spots or residual moisture. Use a lint roller to remove any remaining pet hair or lint. For ongoing protection, consider applying a fabric protector spray suitable for chenille, which helps repel future stains and dust. Proper maintenance prolongs your effort and maintains the sofa’s inviting feel, turning your cleaning into a long-term investment rather than a one-off task. If you’re ever uncertain about specific cleaning products or techniques, consulting cleaning experts can provide tailored advice, keeping your sofa pristine without risking damage.Many homeowners operate under misconceptions about cleaning, often leading to mistakes that compromise both effectiveness and fabric safety. While most believe that scrubbing harder or using harsher chemicals yields cleaner results, in my experience, these practices can damage delicate upholstery and health — a point backed by cleaning expert this detailed guide. One prevalent myth is that bleach or vinegar are universal disinfectants; however, such chemicals can weaken chenille fibers and cause discoloration if not used appropriately. A nuanced approach involves understanding the specific fabric properties, like those detailed in velvet upholstery care.
A common oversight is neglecting to test cleaning agents in hidden areas first, which can result in persistent damage or color loss. The mistake is thinking that a larger application equals better sanitization, yet over-saturation often leads to mold growth and fiber fraying, especially when drying is insufficient. The key is controlled application, such as using a spray bottle for even, light misting.
For those aiming for advanced results, understanding the hiding spots for germs is crucial. For example, dust bunnies in carpet fringes or deep within seams harbor bacteria and allergens. Regular vacuuming alone isn’t enough; integrating scientifically validated sanitization techniques makes a significant difference. In fact, studies confirm that targeted deep cleaning reduces microbial presence more effectively than superficial methods.
Another mistake is assuming that dry cleaning means no moisture at all, but in reality, some fabrics require specific low-moisture methods to prevent shrinkage or stiffness. Techniques like dry foam cleaning or low-moisture encapsulation are often misunderstood; they provide effective sanitation without the typical pitfalls of over-wetting. Exploring these advanced methods can elevate your cleaning routine.
Finally, beware of the ‘set and forget’ mentality. Deep cleaning isn’t a one-and-done task. Regular maintenance with proper techniques, as outlined in upholstery care tips, prevents grime buildup that’s harder to eliminate later. Fail to recognize these nuances, and you risk decreased furniture lifespan, ongoing allergens, and potential health issues. So, are you falling prey to any of these myths or mistakes? Let me know in the comments! Remember, mastering the complexities of effective sanitization is what separates a good-clean from a truly spotless home.Maintaining a spotless home requires not just a good routine but also the right tools that make the job efficient and effective. Over the years, I’ve refined my arsenal to include equipment and methods that deliver professional results without the hefty price tag or complex setups. One game-changer for me has been investing in a high-quality handheld vacuum with HEPA filtration, like the Dyson V7. Its lightweight design allows for quick cleanings of upholstery and tight corners, and its HEPA filter traps allergens—crucial for maintaining indoor air quality. Additionally, I swear by a microfiber steam mop for hard floors; it sanitizes using just water vapor, eliminating the need for chemical cleaners and ensuring long-term durability of flooring surfaces. For fabric sanitization, I rely on a professional-grade upholstery foam that penetrates deep without over-saturating, preventing damage—this aligns with recent research indicating that low-moisture cleaning techniques significantly extend fabric longevity. Looking ahead, I predict that smart cleaning devices equipped with IoT integration will become standard, allowing for scheduled maintenance and real-time alerts to keep homes pristine with minimal effort. For example, robotic vacuums like the Roomba s9+ not only vacuum autonomously but can be paired with app notifications to remind you when filters or brushes need replacement.
How do I maintain my cleaning tools over time?
Regular maintenance is key. I clean my vacuum filters every month, replace batteries as recommended, and check for debris buildup in brushes. For mops and microfiber cloths, I wash and replace them frequently to prevent bacteria accumulation. Such simple steps ensure your tools stay effective and extend their lifespan. To keep your cleaning routine smooth and prevent tools from becoming a bottleneck, consider setting up a dedicated storage space with labeled bins for each item, simplifying access and organization. As your toolkit grows, so does your capacity to stay ahead of dirt and grime, saving you time and stress during housecleaning sessions. If you’re interested in integrating smart tools into your regimen, I recommend exploring options like the iRobot Roomba for autonomous vacuuming, which can be scheduled through an app, making maintenance effortless. Want personalized advice on the best tools for your home? Reach out through our contact page. Remember, only with the right equipment and consistent upkeep can you ensure your home remains a clean, hygienic sanctuary long-term. For more expert tips on optimizing your cleaning toolkit, check out this resource. Try adopting a regular tool maintenance schedule today—your home will thank you for it.
Lessons Hidden in My Upholstery Failures
One of the biggest surprises was realizing that rushing through cleaning procedures compromises both fabric integrity and hygiene. I learned that aggressive scrubbing or overuse of chemicals not only damages delicate chenille fibers but also creates an environment where bacteria can thrive. Patience and a gentle touch are essential, especially with vintage or high-quality upholstery. Another insight came when I ignored the importance of thorough drying; dampness led to mold, which was far more damaging than any stain or dirt. These mistakes taught me that comprehensive understanding and careful execution are key to safeguarding my sofa’s plushness and your home’s health. Lastly, I discovered that regular maintenance, even when the sofa looks perfect, prevents the buildup of allergens and germs that invisible to the eye but harmful over time. Consistency is your best ally, ensuring that your sofa remains a cozy, hygienic sanctuary in your home.