Ever found yourself elbow-deep in greasy grime, only to realize you’ve been scrubbing the same stubborn spot for what feels like an eternity? I know that struggle all too well. One weekend, I ended up lost in a sea of degreasers and scrub brushes, only to step back and see streaks, smudges, and a lingering smell of burnt oil. It hit me—there has to be a better way. If you’ve ever faced the frustration of cleaning your range hood filter without hours of back-breaking work, you’re not alone. Luckily, after a bit of experimenting and a sprinkle of neighborly advice, I discovered a simple method that transforms this dreaded chore into a manageable task.
Cleaning Your Range Hood Filter Without the Hours of Scrubbing Is Possible
What if I told you that the deep clean your kitchen desperately needs doesn’t have to come with sore arms or a cloud of fumes? Today, I want to share how I cracked the code on making my range hood sparkle without sacrificing my weekend or my sanity. This solution not only saves time but also keeps your kitchen air fresher and your appliances in top shape. Trust me, implementing these tips turned my messy, greasy filter into a shining example of effortless cleanliness—and it can do the same for you. So, before you reach for that heavy-duty scouring pad again, let’s explore a smarter way.
Is Deep Cleaning Your Range Hood Filter Really Worth the Hype?
Early on, I made a mistake that almost deterred me from trying a new approach. I believed that soaking my filter in a toxic chemical bath was the only way to get it truly clean. Turns out, that was both unnecessary and potentially harmful, especially if you have kids or pets. According to cleaning experts, using simple, natural solutions can be just as effective and much safer for your family and the environment. It was a lightbulb moment for me—sometimes, less is more. If you’re skeptical about avoiding those harsh chemicals or wonder if it’s worth the effort, just remember: a well-maintained filter not only improves air quality but also prolongs the lifespan of your appliance, saving you money in the long run. Curious how I transitioned from hours of scrubbing to a quick, effective process? Keep reading, because your kitchen’s new best friend is just a few steps away.
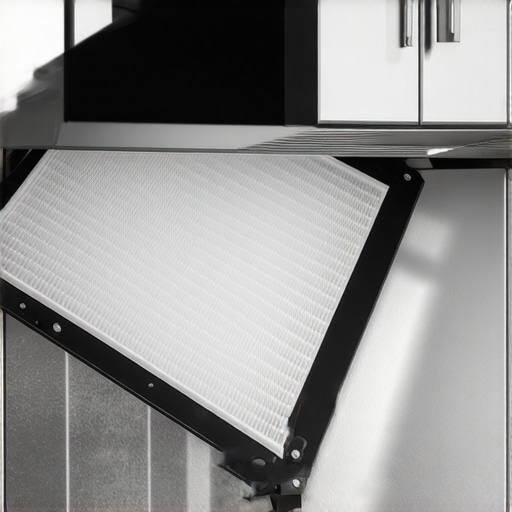
Prepare Your Workspace and Gather Supplies
Start by disconnecting the range hood from power to ensure safety. Remove the filter following your manufacturer’s instructions—usually sliding or unclipping it. Gather a solution of hot water and a few drops of dish soap or baking soda, along with a non-abrasive scrub brush, a sponge, and towels for drying. I recall one weekend when I decided to tackle my greasy filter; laying everything out on the countertop made the process smooth and mess-free.
Soak the Filter for Easy Grease Removal
Submerge the filter in the hot soapy water, making sure it’s fully covered. Let it soak for 15-20 minutes to loosen stubborn grease and grime. Think of it like pre-treating a coffee stain—it softens the grime’s grip, making scrubbing more effective. Once soaked, you’ll notice the greasy layer soften, simplifying removal. I once soaked my filter overnight for deep cleaning, which made scrubbing a breeze the next day, leaving it almost spotless with minimal effort.
Scrub Away Grease and Residue
Use a soft-bristled brush or an old toothbrush to gently scrub the filter, focusing on corners and the mesh. The soak softens the grease, so a gentle scrub is enough—no need for abrasive pads. Rinse thoroughly with hot water afterward. The key here is to work in sections, much like cleaning a delicate sweater—you don’t want to tear or damage the mesh. During my last clean, I used a natural vinegar solution mixed with water to tackle stubborn spots, which proved effective without harsh chemicals.
Handle Tough Spots with a Baking Soda Paste
For especially stubborn grease, make a paste of baking soda and water. Apply it to the grime and let it sit for a few minutes before scrubbing gently. Baking soda acts like a mild abrasive and neutralizes odors, rejuvenating your filter. I remember applying this paste on my greasy kitchen vent last week—I was amazed how easily the grime lifted, leaving the filter fresh and clean.
Dry and Reinstall Your Filter
Shake off excess water and pat the filter dry with a towel or let it air dry completely before reinstalling. A dry filter prevents mold growth and ensures optimal airflow. When I reinsert my cleaned filter, I make sure it’s entirely dry; otherwise, I risk unpleasant odors. After drying, simply slide or clip the filter back into place, and reconnect the power. Remember, regular cleaning extends the lifespan of your range hood and improves air quality—it’s a small effort for a healthier kitchen environment. For more tips on maintaining other appliances, consider exploring effective house cleaning secrets.
When it comes to home cleanliness, many people rely on popular techniques or surface-level advice, but this often leads to overlooked pitfalls that can undermine your efforts. One common misconception is treating all upholstery cleaning as equal—believing that a quick vacuum or spray of cleaner suffices. In reality, understanding the nuanced fabric types and their specific care needs is vital. For instance, delicate silk or velvet upholstery requires gentle handling and specialized cleaning methods, which most DIY kits overlook. This oversight can cause irreversible damage, fading, or stiffness over time. According to a 2022 study by the Institute of Home and Commercial Cleaning, improper maintenance accelerates wear and tear, reducing furniture lifespan. Similarly, many assume that household cleaning products are universally safe—another myth that needs busting. Common kitchen and bathroom cleaners often contain harsh chemicals that can leave residues, trigger allergies, or corrode surfaces if used improperly. It’s essential to read labels and choose eco-friendly or fabric-compatible solutions, especially for high-touch or porous surfaces. Moving to the topic of move-out cleaning, there’s a trap of trying to save time by rushing through tasks or skipping detailed areas like baseboards or behind appliances. This shortcut can result in losing your security deposit or incurring additional charges because of overlooked damages or stains. Comprehensive cleaning guides emphasize thoroughness for a reason; missing those hidden dust traps behind shelves or neglected grout lines invites mold growth or pest infestation later. Now, what about sanitizing? Many think that spraying disinfectant is enough—yet, improper application can be ineffective. For example, disinfectants require specific contact times to kill bacteria and viruses effectively, which is often misunderstood. Also, applying disinfectant on dirty surfaces without pre-cleaning can trap bacteria instead of eliminating them. Proper sanitizing involves a two-step process: cleaning first, then disinfecting, as highlighted by experts from the Centers for Disease Control and Prevention. Let me pose a question that challenges common practice: are you aware of the hidden bacteria lurking in your household appliances and hidden corners that typical cleaning methods don’t reach? For example, deep-seated grime in dishwasher filters or mold behind bathroom tiles can harbor pathogens, making regular cleaning insufficient. This is where targeted, detailed cleaning routines and the right tools make a difference. For advanced tips and safe techniques, you might find our guide on effective house cleaning secrets invaluable—it’s packed with insights from industry professionals. Remember, quick fixes rarely solve underlying issues; embracing detailed and fabric-specific care will save you money, extend your furniture’s life, and ensure a truly healthy environment. Have you ever fallen into this trap? Let me know in the comments.Maintaining a clean and healthy home isn’t just about quick fixes; it requires the right tools and consistent routines. Personally, I rely on high-quality microfiber cloths because they trap dust and microbes better than traditional towels. For upholstery, I swear by a handheld steam cleaner like the BLACK+DECKER Steam Mop, which disinfects without chemicals—perfect for delicate fabrics. Investing in a good vacuum with HEPA filters, such as the Dyson V11, ensures you capture airborne allergens and fine dust, improving indoor air quality over time. Regularly using a dual-action scrub brush on kitchen grouts and tight spots simplifies stubborn grime removal, saving hours of manual labor. For sanitizing surfaces, I prefer a spray-and-wipe method utilizing EPA-registered disinfectants that comply with CDC guidelines, ensuring safety for households with kids or pets. As cleaning technology advances, I predict integrated smart cleaning systems will become mainstream—bots that can automatically vacuum, mop, and even disinfect your rooms based on schedules you set through an app. How do I maintain my cleaning tools so they stay effective long-term? The secret lies in proper care: wash microfiber cloths at 140°F to eliminate bacteria, replace vacuum filters every three months, and descale steam cleaners monthly with vinegar solutions. These small but important steps extend the lifespan of your equipment and guarantee optimal performance. Remember, using the right tools makes a difference, and developing a routine with these devices can drastically improve your home’s cleanliness. To learn more about optimal cleaning routines and advanced techniques, check out our comprehensive guide on effective house cleaning secrets from cleaning experts. Don’t hesitate—try incorporating a microfiber cloth into your daily dusting regimen today and experience the difference! Additionally, for specialized upholstery cleaning, invest in a portable steam cleaner, which can quickly refresh your fabric furniture without the need for harsh chemicals. Remember, staying consistent and using the right equipment are key to a healthier, fresher living space.
Lessons That Sparked My Upholstery Cleaning Revolution
One of the biggest lessons I learned is that patience outweighs brute force. Rushing to scrub stubborn stains often made things worse, damaging delicate fabrics and wasting time. Instead, soaking and gentle scrubbing, combined with natural solutions, transformed my approach and saved me from costly replacements. Another insight was realizing how overlooked hidden spots—like behind cushions or under furniture—harbor dirt and grime, emphasizing the importance of thoroughness. Lastly, I discovered that investing in the right tools, like microfiber cloths and steam cleaners, not only simplifies cleaning but also ensures a deeper, safer refresh for my home—something I wish I’d grasped earlier.”