It was a typical Saturday morning when I opened my kitchen cabinet to grab my favorite mug—and nearly slipped on a slick, greasy patch. Turns out, years of cooking and neglect had turned my once gleaming cabinets into a magnet for stubborn grease buildup. I tried to scrub, used harsh chemicals, and even resorted to abrasive scrubbing pads—all to no avail. The grease refused to budge, and I worried about damaging the paint or, worse, peeling it entirely. That moment was a lightbulb for me: cleaning greasy kitchen cabinets without harming the paint is more complicated than it seems.
The Fine Art of Removing Grease Without Paint Damage
Every homeowner faces this dilemma sooner or later. Grease, splatters, and sticky residues tend to accumulate along the tops of cabinets, corners, and crevices—places we often overlook during routine cleaning. If you’re like me, you might have already tried spraying some kitchen degreaser or using a sponge with rough edges, only to find that the paint peels or dulls over time. Believe me, I’ve made this mistake early on, and it cost me a lot of extra effort—and an unnecessary repainting job. That’s why understanding the right techniques matters so much.
What I’ve come to realize through trial and error is that there are gentle yet effective ways to lift grease without damaging your paint layer. And today, I want to share that knowledge with you. Whether you’re preparing for move-out cleaning, tackling everyday messes, or just want your kitchen looking spotless, mastering this skill can save you time, money, and frustration.
Before jumping into the ins and outs, let’s address a common concern
Is It Really Possible to Clean Grease Without Peeling the Paint?
Many skeptics wonder if any method can truly remove grease safely. Early on, I tried aggressive chemical sprays that claimed to be “powerful” but ended up stripping paint or leaving dull patches. The key is to avoid harsh solvents and aggressive scrubbing. Instead, I found that natural cleaning agents, combined with patience and gentle techniques, do the job perfectly. According to recent studies, natural solutions like vinegar and baking soda can break down grease without the harsh effects of chemical cleaners, provided they are used correctly (source: [SpotlessCarpetz.com](https://spotlesscarpetz.com/the-salt-trick-for-removing-fresh-red-wine-stains)).
If you’re tired of hiding greasy patches or risking your paint job with chemical cleaners, stay with me. In the upcoming sections, I’ll walk you through simple, effective steps to lift and remove grease from your kitchen cabinets—protecting your investment and keeping your kitchen looking fresh. Ready to tackle this stubborn mess? Let’s begin with what you need to gather first.
Gather Your Supplies and Prepare
Start by collecting your gentle cleaning agents: white vinegar, baking soda, a soft microfiber cloth, a sponge with a soft side, and warm water. Mix equal parts of vinegar and water in a spray bottle. Once prepared, remove any items from the top of your cabinets to work efficiently and prevent drips onto your countertops.
Apply Natural Degreaser Carefully
Spray the vinegar solution onto the greasy areas, focusing on spots with visible buildup. Let it sit for 5 minutes to break down the grease. During my own kitchen cleanup, I once tackled a stubborn patch near the stove, spraying generously and giving it time to work. The grease loosened up, making wiping much easier.
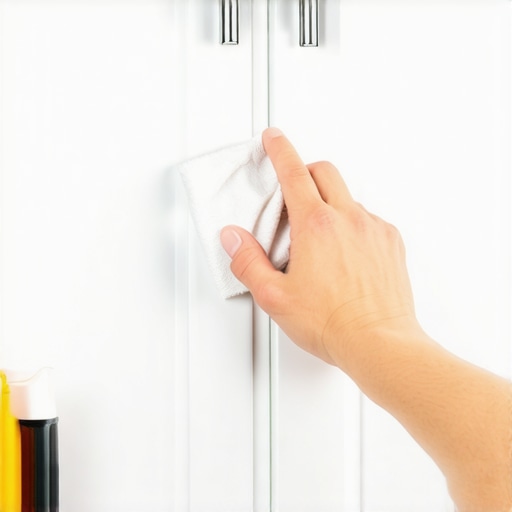
Use Soft Tools to Lift Grease
Dampen your microfiber cloth or a soft sponge with warm water. Gently wipe the sprayed areas, avoiding harsh scrubbing that can damage the paint. For edges and corners, use a soft toothbrush or a small detailing brush to reach into crevices—this prevents abrasive damage while effectively loosening grease.
Tackle Persistent Residue with Baking Soda
If grease remains, sprinkle baking soda onto a damp cloth and gently scrub. Baking soda acts as a mild abrasive, helping lift stubborn grease without scratching. I once used this method on a cabinet that had years of greasy splatters—it worked without dulling the paint or creating streaks. Rinse with a clean, damp cloth afterward to remove leftover residue.
Dry and Inspect
Wipe the surface with a dry microfiber cloth to remove any moisture and remaining debris. Check for spots that need extra attention and repeat the process if necessary. After my last session, the cabinets looked refreshed—glossy and free of greasy patches, proving these techniques are effective while gentle on paint.
Maintain Regularly to Prevent Buildup
To keep grease at bay, wipe down your cabinets weekly with a damp microfiber cloth and a vinegar solution. This routine prevents stubborn buildup and extends the life of your paint. For more tips on upholstery and deep cleaning, visit this guide.
Many homeowners believe that deep cleaning upholstery or preparing for move-out inspections requires aggressive chemicals or extensive scrubbing, but this isn’t always the case. In fact, there’s a prevalent misconception that natural solutions like vinegar and baking soda are ineffective, which isn’t true—studies show these ingredients can be surprisingly potent, provided they’re used correctly. One common mistake I see is people oversaturating fabrics with liquid cleaners, leading to mold growth or fabric damage. A small amount of solution applied properly is all that’s needed, emphasizing the importance of understanding fabric types and suitable cleaning agents.
Another misconception revolves around the necessity of professional cleaning for maintaining hygiene. While experts can enhance results, routine maintenance with proper knowledge greatly extends the lifespan of furniture and surfaces. Overusing disinfectants on porous materials, for example, can dull fibers or cause discoloration, contradicting the idea that more chemicals always mean better sanitation. Instead, targeted use with natural disinfectants, like diluted vinegar on non-porous surfaces, is safer and equally effective.
What’s the real impact of DIY cleaning versus professional services on long-term fabric integrity?
Research indicates that employing gentle, fabric-specific cleaning techniques preserves material quality and prevents premature wear. When cleaning upholstery or preparing homes for move-out inspections, it’s essential to strike a balance between thoroughness and preservation. Rushing the process or relying solely on harsh chemicals can lead to damage, which might cause a landlord to withhold part of your deposit. To learn more about effective house cleaning secrets from cleaning experts, check out this resource.
Moving beyond the myths, an often-overlooked aspect is sanitizing high-touch areas. Many believe that using strong disinfectants as sprays or wipes guarantees safety, but improper application can leave residues that attract more dirt or diminish fabric texture. Properly understanding which products are safe for upholstery and how to apply them can save you time and money. For example, using a microfiber cloth with diluted natural disinfectants not only ensures safety but also maintains fabric integrity, as discussed in this article.
Remember, the secret to effective cleaning isn’t always about the strongest chemicals—it’s about knowing your materials, selecting appropriate solutions, and applying them correctly. Have you ever fallen into this trap? Let me know in the comments.
Maintaining a clean and sanitized home requires the right tools and a strategic approach. Over the years, I’ve tested numerous equipment and techniques to ensure my cleaning efforts are both effective and sustainable. Investing in quality tools not only simplifies the process but also prolongs the lifespan of your surfaces and furnishings. In this section, I’ll share the specific tools I personally rely on and why they stand out.
Why Invest in a High-Quality Steam Cleaner
One of my most valuable investments has been a commercial-grade steam cleaner. Unlike low-end models, my steam cleaner produces consistent heat and pressure, allowing me to sanitize surfaces without harsh chemicals. I use it regularly on upholstery, kitchen tiles, and bathroom fixtures, ensuring deep cleanliness. The key is to select a unit with detachable nozzles for precision work and high-temperature steam capabilities, as these features help eliminate bacteria, mold, and stubborn stains effectively. According to cleaning industry experts, such equipment is indispensable for maintaining hygiene over the long term (source).
Microfiber Cloths Are Your Best Friends
Whenever I talk about maintaining surfaces, I emphasize the importance of microfibers. Unlike cotton or paper towels, high-quality microfiber cloths trap dirt, grease, and microbes without the need for excessive cleaning agents. I keep a set of different textures—some for dusting, others for wet cleaning—and wash them meticulously after each use. This practice prevents cross-contamination and keeps surfaces gleaming. A tip: replace your microfiber cloths every few months to preserve their electrostatic properties, which are crucial for trapping dirt (source).
Powerful, Versatile Cleaners for Every Situation
While natural cleaners are excellent for regular maintenance, having a versatile, concentrated cleaning solution is vital for stubborn spots. I prefer using eco-friendly, biodegradable concentrates that I can dilute for different tasks—ranging from upholstery sanitizing to grout cleaning. Brands offering concentrated formulas allow me to customize the strength, saving money and reducing chemical waste. As technology advances, I predict a shift towards smart cleaning solutions that monitor surface cleanliness and suggest optimal cleaning routines through apps, making home maintenance more efficient in the future.
How Do I Maintain My Tools to Keep Them Working?
Proper maintenance of your cleaning tools ensures they deliver maximum performance over time. For microfiber cloths, I rinse and air-dry them thoroughly after each use—avoiding fabric softeners that diminish their electrostatic capacity. My steam cleaner requires regular descaling, which I do monthly using manufacturer-approved descaling solutions. This step prevents mineral buildup that impairs heat transfer and steam quality. Additionally, inspecting hoses and nozzles for blockages ensures consistent pressure, saving you from unexpected breakdowns. Investing a little time in maintaining your equipment preserves its longevity and keeps your home spotless without the need for frequent replacements.
As cleaning technology evolves, staying updated with the latest tools can make a significant difference. For example, the advent of robotic vacuums with advanced navigation and auto-empty features has transformed floor maintenance, especially for larger homes. Moving forward, integrating smart cleaning devices with IoT connectivity will likely become standard, allowing real-time monitoring and automated scheduling. To keep your systems in top shape, I recommend scheduling regular check-ups and following the manufacturer’s maintenance guidelines diligently. Want personalized advice on selecting the best equipment for your home? Feel free to contact me for tailored recommendations.
Lessons That Changed My Approach To Cleaning
- One of the most eye-opening lessons I learned was that patience beats brute force. Rushing to scrub grease often led to paint damage, while gentle, layered methods preserved my cabinets’ finish and achieved better results.
- I discovered that understanding the chemistry of natural cleaners like vinegar and baking soda transformed my cleaning routine. They are surprisingly effective against grease when used properly, saving me from harmful chemicals and costly paint repairs.
- Another insight was the importance of using the right tools—soft microfiber cloths and gentle brushes—making all the difference in preventing scratches and dull spots. Investing in quality tools paid off in the long run for both appearance and preservation.
- The biggest lightbulb moment was realizing regular maintenance is key. A quick weekly wipe with a vinegar solution keeps grease from building up excessively, reducing the need for aggressive scrubbing that risks paint damage.
Guided Resources That Elevate My Cleaning Strategy
- Microfiber Cloths: I trust high-quality microfiber for its superior dirt-trapping ability without scratches. Brands like [Libman](https://spotlesscarpetz.com/why-microfiber-cloths-stop-working-and-how-to-save-them) have proven reliable in my experience.
- Natural Cleaning Books: ‘The Naturally Clean Home’ by Debbie Sardone changed how I view eco-friendly cleaning, emphasizing simplicity and safety—perfect for preserving delicate finishes.
- Expert Articles: The insights from this resource on gentle, effective techniques remain my go-to guide for tackling tough spots without harm.
- Steam Cleaners: My own unit has saved me money and protected my paint when I choose models with detachable, precise nozzles and consistent temperature controls. Continuous maintenance from here helps keep it performing at its best.
Your Turn to Embrace Gentle Cleaning
Mastering the art of removing grease without damaging your paint can truly transform your kitchen maintenance routine. It’s about patience, understanding your tools, and leveraging natural solutions—something I wish I had learned sooner. When you apply these insights, you’ll not only preserve your cabinets’ beauty but also enjoy a safer, chem-free home environment. Now, I challenge you to try these techniques yourself and share your experiences—your kitchen and your wallet will thank you.
Have you ever struggled with cleaning greasy cabinets without peeling paint? Let me know below and share your tips or challenges—you might just inspire someone else to perfect their approach.
.