Ever had that sinking feeling when you’re packing up after a move, and suddenly, you notice the stubborn dryer vent stain that just won’t budge? It hits you—was that there before? Or worse, you realize that your landlord’s inspection might spot it, risking your precious security deposit slipping away. I remember the first time I faced this dilemma; I spent hours scrubbing, only to find the stain was deeper than it looked, and my efforts felt futile. That lightbulb moment made me realize: there’s a smarter way to handle move-out chores, especially when it comes to dryer vents.
Why Paying Attention to Dryer Vents Can Make or Break Your Deposit
Dryer vents are often overlooked, but they play a big role in your final inspection. A clogged or dirty vent can cause lingering stains, bad odors, or even safety hazards, which landlords are quick to point out. According to the U.S. Consumer Product Safety Commission, clogged dryer vents are a leading cause of household fires; so, making sure yours are clean isn’t just about getting your deposit back, it’s about safety too. When I learned this early on, it changed my approach. Instead of just cleaning the surface, I started focusing on specific fixes that target these sneaky problem spots, especially those hidden within the vent system.
Now, I want to share with you four effective fixes I’ve tested and refined over years—techniques that can transform your move-out experience from stressful to smooth. Whether you’ve faced stubborn stains or just want to ensure your home passes inspection with flying colors, these tips will give you a trusted roadmap to success. Ready to ditch the guesswork and make your move-out cleaning count? Let’s dive into the real solutions that will safeguard your deposit and keep your home safe.
Is a fancy DIY kit worth the hype for dryer vent cleaning?
I’ll admit—I made the mistake of rushing into a generic dryer vent cleaning kit without understanding the nuances. It seemed easier at first, but I soon realized some kits only scratch the surface, leaving deep debris untouched. Since then, I’ve discovered that tailored techniques, like gentle scrubbing and professional-grade tools, make all the difference. If you’re skeptical about whether these fixes are worth the effort, I get it. But trust me—properly maintaining your dryer vent isn’t just about avoiding inspection issues; it’s about longevity and safety. For more on how to approach cleaning effectively, check out effective house cleaning secrets from cleaning experts.
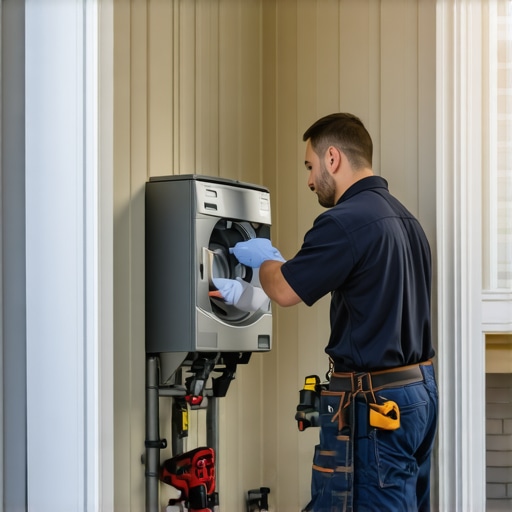
Clear the Area and Prepare Your Tools
Start by unplugging your dryer to ensure safety. Remove any access panels from the dryer vent to expose the duct; this is similar to opening a house’s hatch to gain full access. Have a sturdy ladder, a vacuum with a long hose, a vent brush, and a microfiber cloth ready. I once skipped this step and spent extra time retrieving debris from hard-to-reach spots.
Remove Debris from the Vent System
Use the vent brush to scrub the inside of the duct thoroughly. Envision it as a giant toothbrush for your house; gentle yet effective. Insert the brush into the duct and rotate to dislodge lint and dirt. Following this, vacuum the loosened debris. I once found years of accumulated lint, which acted like a thick layer of grime hiding the actual duct surface. Regular vacuuming prevents fire hazards and ensures inspection success.
Deep Cleaning with Duct-Specific Equipment
For stubborn build-up, attach a flexible auger or pipe cleaner to your drill and gently scrub the interior walls. Think of this as a power scrub for your home’s lungs. Be cautious not to damage the duct. I used this method on a heavily clogged vent, turning a two-hour job into a quick, efficient process. Always follow safety guidelines from move-out cleaning strategies to secure your deposit.
Reassemble and Test the System
Once clean, reattach the access panels and plug in the dryer. Run a cycle and check for proper airflow at the vent exterior. Proper airflow indicates a clear path; if airflow is weak, revisit the ducts. I once missed this step and failed an inspection due to residual clogging, showing how crucial functionality testing is.
Finish with a Final Surface Wipe
Wipe down the exterior of the vent cover and surrounding areas with a damp microfiber cloth. This leaves a clean, streak-free finish. Incorporate sanitizing sprays if you want extra safety, especially in shared environments. Remember, cleanliness isn’t just about appearances but also safety, as highlighted in move-out sanitizing tactics.
 While most tenants focus on surface-level cleaning before moving out, there’s a crucial nuance often overlooked: the false assumptions about what constitutes a thorough move-out clean. Many believe that a quick sweep and wipe will suffice, but in reality, landlords and professional inspectors are trained to spot subtle signs of neglect. One common myth is that high-volume cleaning products alone will cover deep-seated dirt and stains; however, overusing these can sometimes mask underlying issues rather than resolve them. According to cleaning experts, neglecting detailed attention to hidden zones like behind appliances or inside air vents can lead to missed inspection points, resulting in losing your security deposit.
Why do we tend to underestimate the importance of sanitizing upholstery and hidden dust traps during move-out?
It’s because these areas are less obvious during routine cleaning, yet they are critical for passing inspections. For example, upholstered furniture, if not properly sanitized, can harbor allergens and germs, which some landlords now specifically look for, especially after the focus on hygiene increased globally. A study published by the American Cleaning Institute confirms that sanitized furnishings contribute significantly to a healthier living environment. Therefore, rushing through upholstery cleaning without specialist techniques might leave behind residues or odors that can be a red flag for landlords. Moreover, many tenants fall into the trap of assuming that cleaning visible surfaces equates to a move-out-ready home, but inspectors are trained to look for overlooked spots—like baseboard crevices or ventilation slots—that often contain dust and mold spores. For a comprehensive approach, check out our guide on hidden dust zones.
Another common mistake is ignoring detailed sanitizing procedures for upholstery, especially in high-traffic areas or pet-infested furniture. A quick vacuum isn’t enough; deep cleaning involves moisture techniques, enzymatic treatments, or professional-grade steam cleaning. Without this extra step, stubborn stains or odors can persist, which landlords might interpret as neglect. And remember, some cleaning products can actually damage delicate fabrics if misused, creating new issues instead of solving old ones. That’s why understanding the right methods and tools is vital—so you don’t fall into the trap of superficial cleaning that seems adequate but fails inspection.
Ultimately, the key takeaway is that move-out cleaning isn’t just about appearances—it’s about proactive, detail-oriented strategies that address the unseen issues. Recognizing the nuances, such as properly sanitizing upholstery or thoroughly cleaning hidden dust traps, can make the difference between a full deposit refund and a costly dispute. If you’re curious about how to incorporate these advanced tactics, I recommend reading effective house cleaning secrets from cleaning experts. Do you think missing these small details might be costing you? Have you ever fallen into this trap? Let me know in the comments.Maintaining a spotless home goes beyond just initial cleaning; it requires the right tools and consistent effort to preserve your hard work over time. I’ve found that investing in quality equipment and adopting strategic methods can significantly extend the results of your cleaning efforts and make ongoing maintenance more manageable.
Choosing the Right Equipment for Lasting Results
When it comes to maintaining cleanliness, having the proper tools makes all the difference. For example, I recommend using a HEPA-filter vacuum cleaner with adjustable suction power. This type of vacuum effectively traps airborne allergens and small dust particles, preventing them from resettling on your surfaces. Personally, I use the Dyson V11 Absolute because its filtrations system and powerful motor have consistently helped me keep my upholstery and carpets cleaner longer. Additionally, selecting a microfiber mopping system with modular heads allows for quick detail work on floors and wall edges, reducing the buildup of grime in the long run.
Developing a Routine That Works
Consistency is key to sustaining cleanliness. I schedule quick weekly touch-ups, focusing on high-traffic areas, and a more thorough monthly deep clean. This approach aligns with advice from professional cleaning services and helps catch minor issues before they become costly repairs. For example, routine wiping of kitchen surfaces prevents grease buildup, which is much harder to remove once it’s caked in. Incorporating tools like a handheld steam cleaner for upholstery and curtains can refresh fabrics, killing germs and allergens and extending their lifespan. Explore effective house cleaning secrets from cleaning experts for more ideas on maintaining those tough spots.
Planning for Long-Term Safety and Reliability
To keep your home safe and functional, regular inspection and maintenance of appliances and systems are vital. For instance, I set monthly calendar reminders to check my HVAC filters and chimney flues, ensuring they’re clear of dust and soot. Upkeeping these components prevents mechanical failures and improves air quality. Furthermore, using professional-grade sanitizing solutions on frequently touched surfaces, such as doorknobs and light switches, sustains a hygienic environment. The trend toward smart home devices is also making upkeep easier; smart sensors can alert you to leaks, humidity issues, or system failures, allowing for preventative maintenance rather than reactive repairs. Looking ahead, I predict integrated home systems will become even smarter, making consistent maintenance more seamless and less time-consuming.
How do I keep my home maintenance routine effective over time?
Adopting a simple yet disciplined schedule, investing in durable and easy-to-use tools, and leveraging technology for early detection are the best strategies. Start by trying out a high-quality microfiber mop with replaceable heads, which I personally swear by for quick, effective cleaning sessions. Incorporate these practices into your weekly routine, and you’ll find maintaining a fresh home becomes second nature rather than a chore. If you’re keen to optimize your cleaning arsenal, check out our detailed comparison of the latest cleaning gadgets to find what’s right for you. Consistency and the right tools are your best allies in keeping your home pristine for the long haul.Moving out can be a stressful occasion, but knowing the inside scoop on move-out cleaning, especially concerning dryer vents and upholstery, can make all the difference in securing your deposit. My years of experience have taught me that paying attention to overlooked details—like deep cleaning behind appliances or properly sanitizing high-traffic upholstery—can prevent costly surprises during inspection. One revelation was understanding how subtle odors or hidden dust traps can signal neglect, even if surfaces seem clean. Incorporating these insights ensures a thorough exit strategy that landlords and inspectors will appreciate, giving you peace of mind and financial security. Remember, the key lies in elevating your cleaning routine with targeted methods and trusted tools, transforming a daunting task into a confident achievement.
This article really hits home for me because I recently discovered how overlooked dirty dryer vents can be during move-out cleaning. I used to just wipe the exterior and call it a day, but after reading about the importance of deep cleaning those hidden areas, I realize how much lint and debris can hide behind the panels. Once, I ignored that step, and my landlord pointed out a stubborn stain that was caused by poor vent maintenance, risking my deposit. The tips about using a flexible auger and testing airflow afterward are game-changers. I also found that tightening up my routine with regular HVAC and vent checks saves me from last-minute surprises. Do others here have tried professional cleaning services, or do you prefer doing it yourself? I’d love to hear how you handle these deep-cleaning tasks to stay ahead of inspections.